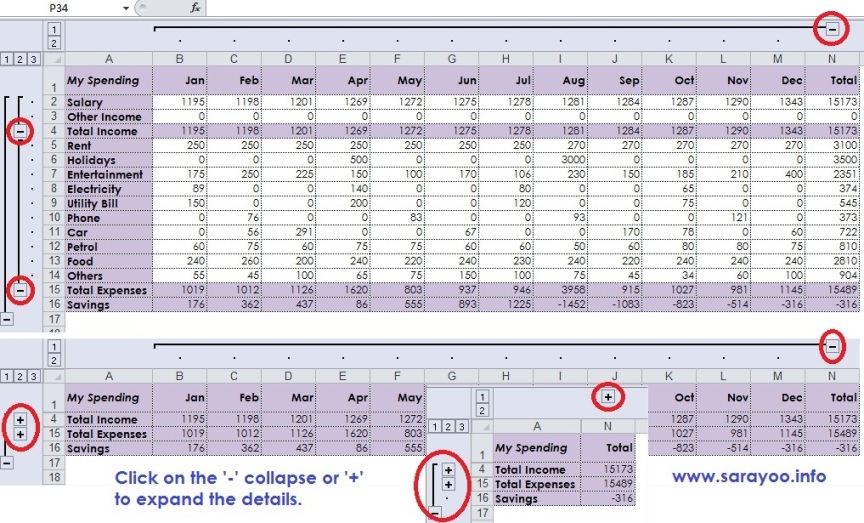
Sometimes you may have to work with very large list of data in Excel Spreadsheets. Browsing through the entire list to look for important data can be tedious. One way to deal with this kind of situation is by grouping and summarizing the entire data. Outline feature in Excel helps you to group data, making it easier to read the data by hiding or showing detail data. In addition to grouping the data and show or hide the details from displaying, Outline also helps you to create Subtotals to show a quick summary of the entire data.
You can create an outline of the rows or the columns or both, upto a maximum of 8 levels on each side. For example, you have an Excel spreadsheet containing staff details such as their names, age, departments, leaves taken, etc. By using Outline, you can create a summary of these data, arranged by departments, showing the subtotals of leaves taken by each department, and hiding or showing the details of employees – all in few clicks.
How to Create an Outline Automatically – Auto Outline
Step 1:
Before you start to create an Outline, you must ensure that each row and column that you want to group using outline has a label in the first row or column and it contains similar data.

Step 2:
Insert Summary rows and Summary columns. You can do this either manually adding a summary of rows and/or columns, or by using SUBTOTAL function.

Step 3:
Select the range of cells and click on Data Tab | In Outline groups, click on Group | Auto Outline

How to Create an Outline Manually
Step 1:
Ensure you complete Step 1 and Step 2 mentioned in the previous section, how to create auto outline.
Step 2:
Select the range of cells. In the given example, first group should include Sales and Other Income rows. And click on Data Tab | In Outline groups, click on Group. Repeat the same for other groups as well.
In the given example, 2nd group includes cell range: Rent, Holidays, Entertainment, Electricity, Utility Bill, Phone, Car, Petrol, Food and Others. Third group can be from the row Salary through row Savings.
Step 3:
Repeat the same steps on the columns if you need to group columns.

Do you find this information useful? Share it with your friends by on Facebook, Google+, Twitter or other Social Media. You can also follow me on Twitter @sarayoo.info or Google+ or Like me on my Facebook or on my LinkedIn for more updates, technology tips and tricks, iPhone, iPad, other iOS devices tips, iOS App Deals, Blogging tips, etc. Please leave your comments in the comment section or contact me if you have any other questions.
